Connecting Devices: Shimmer3 GSR+ and Beam Eye Tracker
Overview
In the previous lesson, you created your first project and set up the testing environment. Before you can begin a proper study, we need to decide what data will be collected and connect the respective devices to the Cinematronic Biosignal Platform (CBP). At the time this lesson was written, the CBP supports three main input sources: the Shimmer3 GSR+ unit for galvanic skin response (GSR), also known as electrodermal activity (EDA), and heart rate derived from photoplethysmography; and the Beam Eye Tracker software, which enables gaze tracking through a standard webcam.
Why these data sources matter
Collecting data without understanding its meaning won't provide the feedback you need for your project. Before connecting sensors or interpreting graphs, it is a good idea to familiarise yourself with the basic measures used in neurometrics. The following section introduces three key data sources supported by the Cinematronic Biosignal Platform, explained in simple terms for first-time users. Do not worry if some of these terms still seem confusing at this stage. We will return to them later in the course and see how they work in practice.
Galvanic Skin Response (GSR), also known as Electrodermal Activity (EDA), is a method for measuring the body's responses in real-time. When individuals experience feelings of suspense, surprise, or excitement, their skin becomes slightly more conductive due to increased activity in tiny sweat glands, even if there is no visible sweating. A sensor can detect these subtle changes in skin conductivity.
What GSR shows us is the intensity of the reaction, not whether it was pleasant or unpleasant. A sudden spike could mean that a scene was frightening, thrilling, or simply confusing. For this reason, GSR data is most useful when paired with quick interviews, annotations, or questionnaires that help explain why the reaction occurred. In film and media projects, this combination provides both the "when" (the exact moments in the timeline that elicited a response) and the "why" (the participant's own interpretation of these moments).
Heart rate, computed from PPG, offers a complementary view of arousal over slightly longer time windows. Periods of increased intensity often present as elevated heart rate, while calmer stretches return toward baseline. In editorial practice, heart-rate trends can help you assess whether tension is building as intended or whether a sequence plateaus prematurely.
Eye tracking addresses an important question: where do viewers focus their attention? It helps determine whether your composition and editing effectively lead viewers' eyes to the intended subjects, such as faces, props, text, or actions. Additionally, it shows how gaze movements progress across the frame over time. If viewers consistently focus on peripheral elements, you may need to adjust aspects like framing, lighting, or screen direction. When used in conjunction with other techniques, eye tracking enables you to identify when arousal occurs and which on-screen elements are likely driving it. This information provides a solid foundation for making decisions about pacing, scoring, and shot selection.
Key terms to remember:
- GSR/EDA (Galvanic Skin Response / Electrodermal Activity): How much the skin reacts when we feel something strongly.
- PPG (Photoplethysmography): A way to measure heart rate by detecting blood flow in the skin.
- Parasympathetic system: The "calm down" part of the body, active when we are relaxed.
- Sympathetic system: The "alert" part of the body, active when we are stressed, scared, or excited.
- Arousal: A general rise in body activity when we react strongly, without saying whether it is good or bad.
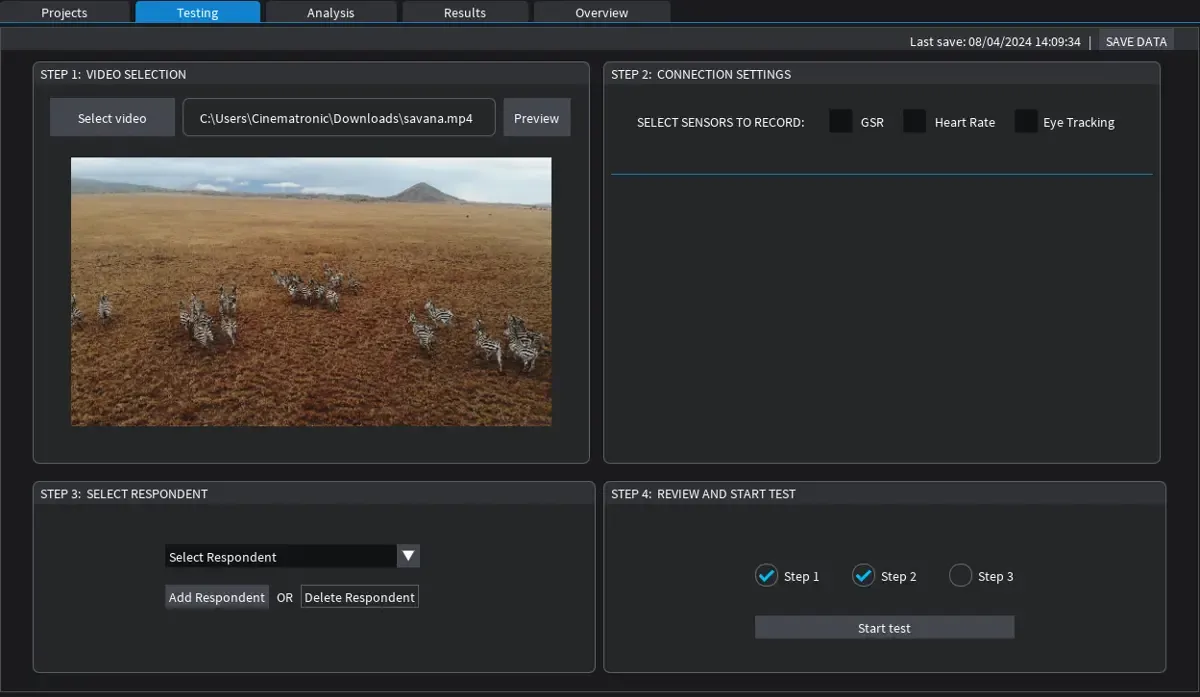
View fo the Testing Environment in the Cinematronic Biosignal Platform. Step 2 allows you to select which sensors to use and which data to collect.
Collecting GSR and PPG
Shimmer3 GSR+: prerequisites and preparation
The Shimmer3 GSR+ is a wearable sensor that measures galvanic skin response (GSR), also known as electrodermal activity (EDA), and photoplethysmography (PPG), from which the software derives heart rate. This device is widely used in psychology, interaction design, and media studies, so it is likely that your university already has one available through a relevant department or equipment pool.
Before connecting the device to the Cinematronic Biosignal Platform, make sure it is fully charged while in its docking station. Then, turn it on using the button located on the side. On the back of the unit, you'll find a unique device code that you will need later for the connection to the Cinematronic Biosignal Platform.
While we will explore proper electrode placement in more detail later in the course, it is helpful to know that the Shimmer device is typically used with finger electrodes. In simple terms, an electrode is a small sensor that makes contact with the skin, enabling the device to measure subtle changes that occur naturally on the surface. These changes can provide valuable insights into the user's current state.
For accurate measurements, place the electrodes on two adjacent fingers, ensuring that the skin is clean and dry. Secure the electrodes with clamps, straps, or adhesive pads, depending on what feels most comfortable and stable for the user.
NOTE: The docking unit used for charging can also be used to update the firmware if needed by following the manufacturer’s instructions. Only update the firmware if absolutely needed.
Pairing the Shimmer3 GSR+ with Windows
The Shimmer device must first be paired with your Windows computer through Bluetooth. This is a one-time process for each machine.
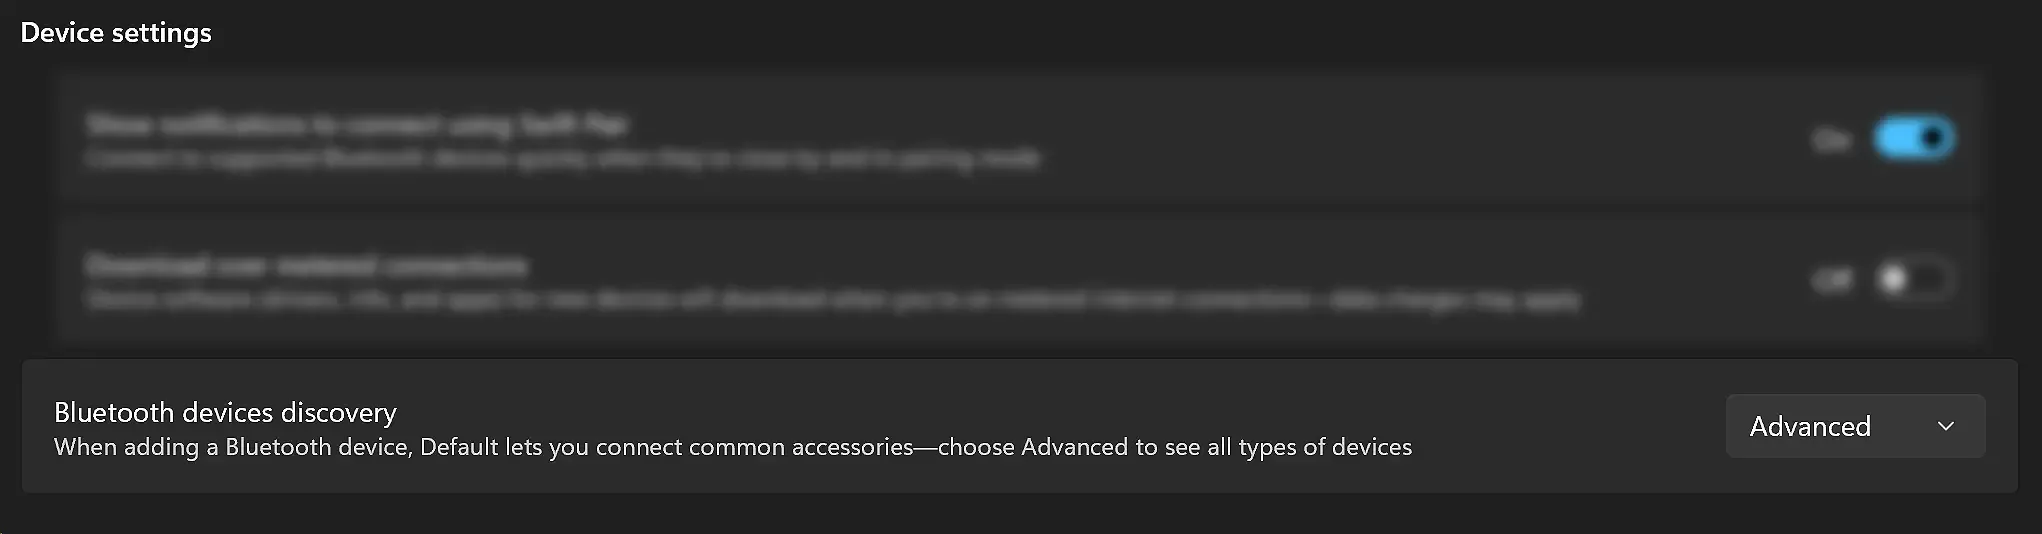
You will find the Advance Bluetooth Discovery setting in the Windows 11 Settings.
Open Settings → Bluetooth & Devices and confirm that Bluetooth is switched on.
- Step 2: Adjust discovery mode (Windows 11 only)
Change the Bluetooth discovery option from Standard to Advanced so that Windows can detect the Shimmer unit.
Click Add device → Bluetooth. Wait for Shimmer3 GSR+ to appear in the list of available devices.
- Step 4: Enter the pairing code
Select the Shimmer device and type in the unique pairing code printed on the back of your unit.
Once paired, the Shimmer will show up in your list of connected devices. This process normally needs to be done only once per computer.
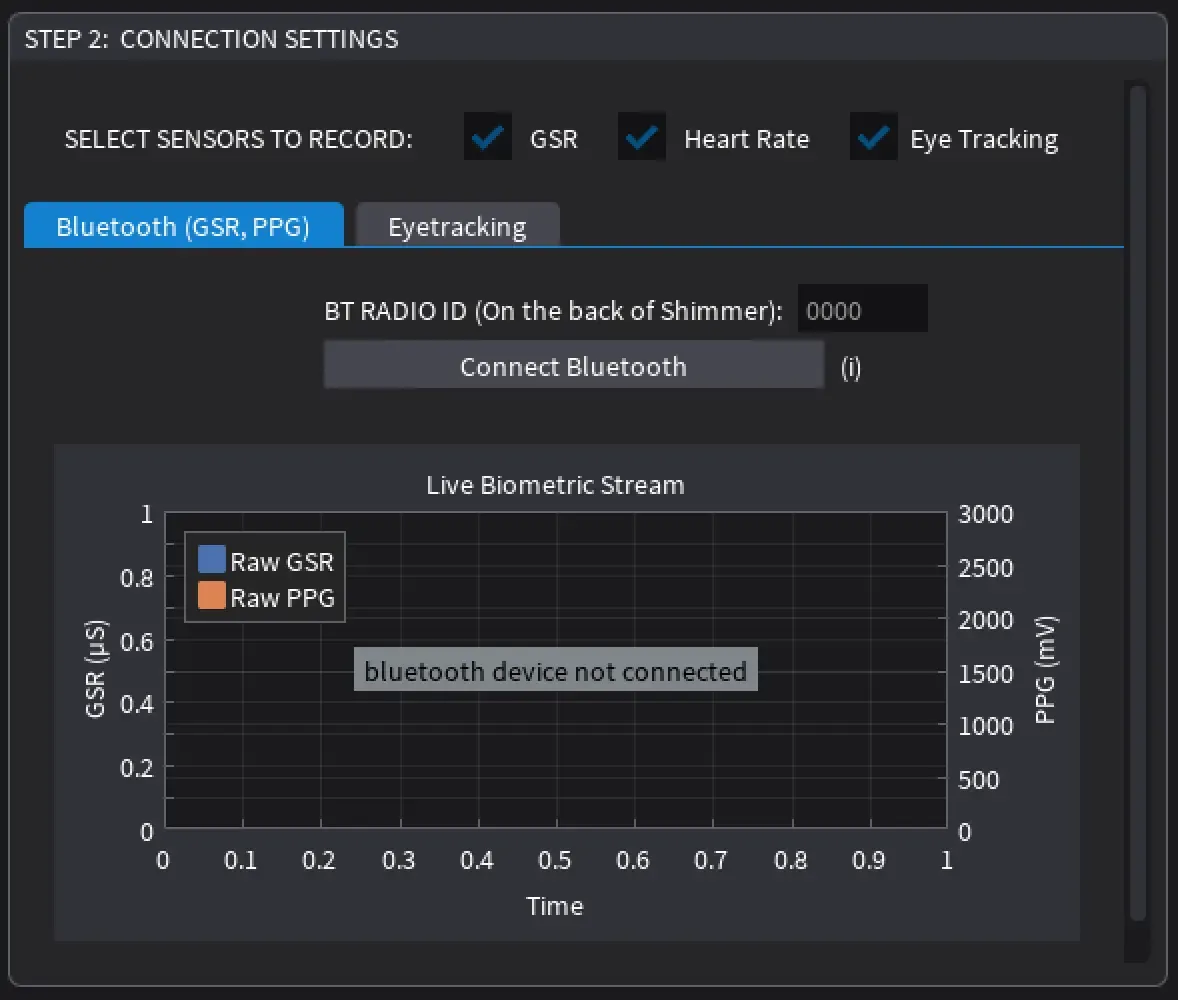
After pairing the device with Windows, open your project in the Cinematronic Biosignal Platform and navigate to the Testing Environment. In the connection settings, you will see options for recording Galvanic Skin Response (GSR) and heart rate. Select the signals you wish to capture, enter the device ID, and click "Connect." If the connection is successful, the software will immediately display live data traces in the graph area.
At this point, you can attach the electrodes to your respondent's hand and verify that changes in the signals correspond to movements, arousal, or simple events such as taking a deep breath. Once this is confirmed, the sensor is ready for testing.
Collecting Eye Tracking
Beam Eye Tracker: prerequisites
The platform also supports eye tracking through the Beam Eye Tracker, a software product created by Eyeware Tech. Please note that the Beam Eye Tracker software is not included in the open-access student version of the platform and requires a separate license.
The main advantage of the Beam Eye Tracker is that it can operate with a standard webcam. For optimal accuracy, it's recommended to use a webcam that records at 60 frames per second and has a narrow field of view, ideally between 50 and 80 degrees. Additionally, a stable front-lighting setup is essential for precise gaze tracking; avoid strong backlighting when possible.
Installing and calibrating the Beam
Once you have installed and licensed Beam, open the program. It runs in the background and can be found in the Windows taskbar. Start by selecting the camera you plan to use, along with its resolution and frame rate. In Beam's main panel, enable the "Gaming Extensions" option. Although it has "gaming" in its name, this setting is not limited to games; it allows the Cinematronic Biosignal Platform to communicate with Beam. For now, disable the "Overlay" option, as it is primarily useful for quick checks.
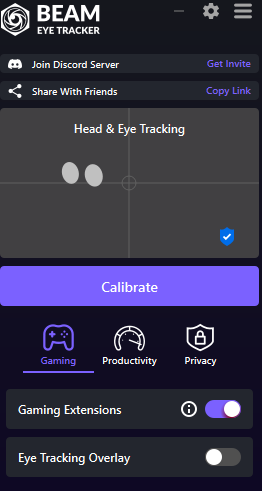
Beam Eye Tracking calibration screen.
Calibration is essential for accuracy. Run the full calibration procedure every time by clicking the "Calibrate" button in Beam and following the on-screen instructions. This process should be repeated for each participant and ideally for each new session.
Return to the Testing Environment in the Cinematronic Biosignal Platform. In the connection settings, enable the eye tracking option. A button to connect the Beam Eye Tracker will then appear. Ensure that Beam is running in the background, and click the button. If the connection is successful, the platform will display a green status indicator. To conduct a quick test, you can toggle the overlay, which shows a yellow circle representing the gaze position. If the overlay does not align with the expected gaze behaviour, please repeat the calibration process.
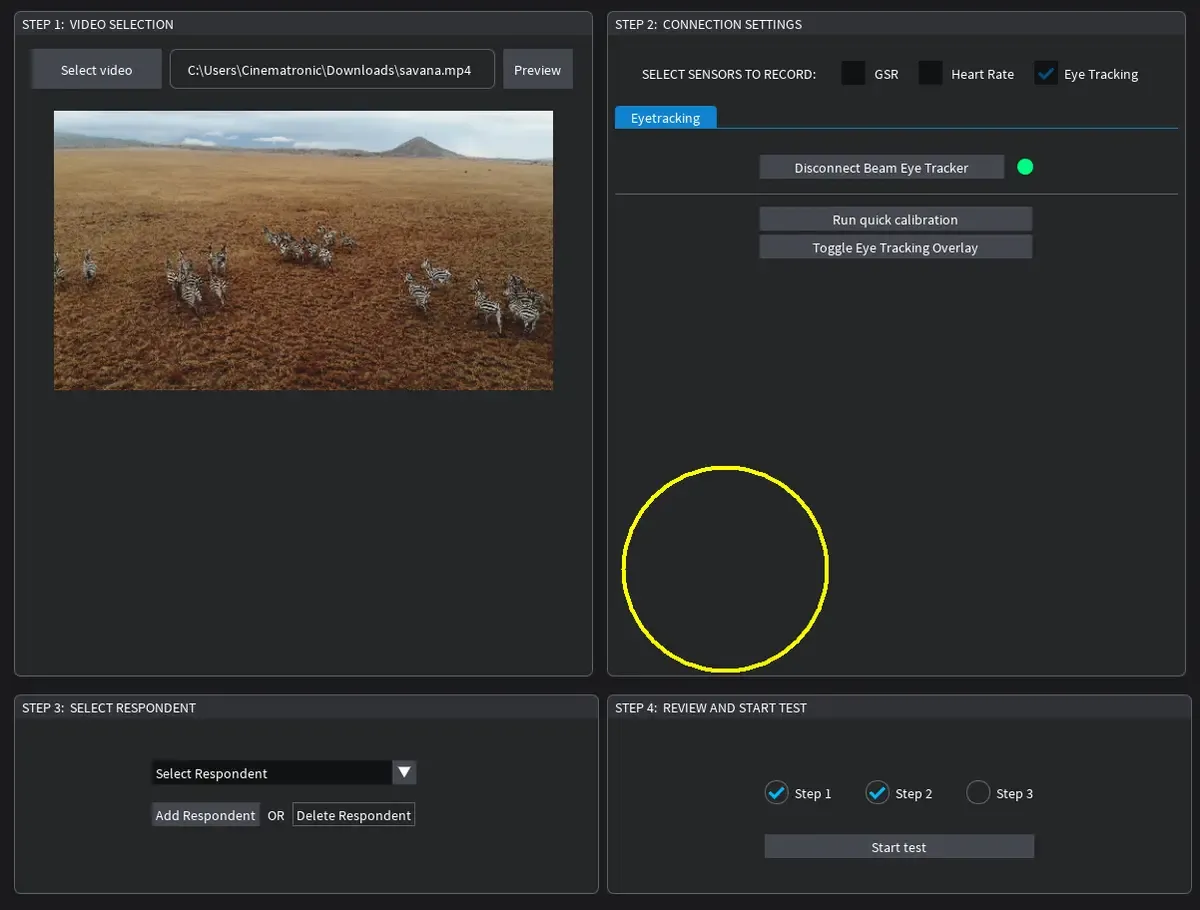
Once eye tracking is connected, you have the option to preview the gaze point by clicking on the "Toggle Eye Tracking Overlay" button in the Testing Environment of the CBP.
Troubleshooting
If you encounter difficulties connecting the devices, here are some steps to troubleshoot:
- Ensure that the Shimmer device is powered on and within range.
- Confirm that Bluetooth discovery mode is set to "Advanced" in Windows 11.
- If pairing fails, check for any old Shimmer entries in your Bluetooth device list and remove them.
- Restart your computer and try pairing again using the correct code.
If the platform displays a flat line after connection, ensure that the electrodes are securely attached, the skin is clean and dry, and allow enough time for the baseline to stabilise.
Quick Connection Guide
- Shimmer3 GSR+
- Charge the unit in its dock and power it on.
- Pair it with Windows via Bluetooth (Advanced mode on Windows 11).
- Enter the unique device code when prompted.
- In CBP's Testing Environment, select GSR/HR, enter the device ID, and connect.
- Verify live data traces before starting a session.
- Electrodes
- Place on two adjacent fingers, ensuring they are clean and dry.
- Secure with clamps, straps, or adhesive pads.
- Allow 2–3 minutes for baseline stabilisation.
- Beam Eye Tracker
- Install, license, and open Beam; select the correct camera.
- Enable "Gaming Extensions" in Beam; disable overlay unless testing alignment.
- Run full calibration for each participant.
- In CBP's Testing Environment, enable Eye Tracking and click Connect Beam Eye Tracker.
- Confirm a green status indicator; recalibrate if the overlay appears inaccurate.
- Before starting a test
- Video selected in CBP.
- Data types (GSR, HR, and Eye Tracking) have been selected and connected.
- Respondent profile created and selected.
- Check that all signals are active and stable.