Course progress
0/7 lessons (0%)
Biosignal Platform: Collecting and Recording Data
This module provides both practical and theoretical foundations for collecting biosignal data using the Cinematronic Biosignal Platform. Students will learn how to set up and connect essential devices, including the Shimmer3 GSR+ sensor for measuring galvanic skin response (GSR/EDA) and heart rate, as well as the Beam Eye Tracker for analysing visual attention. The lessons will cover the technical aspects of device preparation, calibration, and troubleshooting, as well as the creative importance of these data streams in film and media production. By the module's conclusion, students will be equipped to record reliable physiological and gaze data, interpret the significance of these measures, and apply them to real-world projects to enhance editing, pacing, and storytelling decisions.
Cinematronic
September 29, 2025
Learning Objectives:
Connect and set up the Shimmer3 GSR+ and Beam Eye Tracker.
Understand what GSR, heart rate, and eye tracking reveal about audience reactions.
Troubleshoot common connection and calibration issues.
Biosignal Platform: Connecting Devices for Data Collection
This lesson provides practical steps for connecting biosignal devices to the Cinematronic Biosignal Platform. You will learn how to set up the Shimmer3 GSR+ for measuring galvanic skin response (GSR/EDA) and recording heart rate, as well as how to integrate the Beam Eye Tracker for gaze analysis. The lesson will also explain what each data source reveals about audience reactions, the significance of these signals in film and media contexts, and how to interpret them in conjunction with creative choices.
Biosignal Platform: What Can Biometric Data Tell Us
This lesson explores how biometric data can enhance our understanding of audience responses in film and media. Students will focus on three key biosignals: galvanic skin response, heart rate, and eye tracking. The lesson will also cover the autonomic nervous system and the appropriate timescales for measuring these responses. Additionally, the lesson highlights both the potential and limitations of biosignals.
Biosignal Platform: Connecting the Shimmer (GSR) correctly to the hand
It is easy to connect the Shimmer3 GSR+ incorrectly, resulting in unusable data. This lesson specifies a correct finger-electrode placement on the hand, explains the physiological rationale, demonstrates a two-minute baseline and brief test-cue verification, and shows how to recognise and remediate artefacts. Insights from the Interconnection student case study highlight typical failure modes and their corresponding corrections.

In this module, students advance from software installation and project setup to the first step of data collection. The Cinematronic Biosignal Platform is designed to integrate multiple sources of biosignal data. The lessons will guide you step by step through the process of connecting, preparing, and utilising these devices in real-world film and media testing contexts.
The module introduces the Shimmer3 GSR+ sensor and how to connect it to the CPB to measure galvanic skin response (EDA) and photoplethysmography (PPG) for heart rate detection. You'll learn to connect the device via Bluetooth and prepare it with electrodes for accurate readings. Next, the focus shifts to eye tracking through the Beam Eye Tracker, a third-party software tool that works with standard webcams. You will learn how to install, license, and calibrate the software, as well as how to integrate it into the Cinematronic Biosignal Platform.
Next, we will also explore the role of biosignals in film and media projects. Physiological measures, such as galvanic skin response (GSR) and heart rate, indicate arousal intensity but do not reflect whether that response is positive or negative. Eye tracking, on the other hand, reveals where viewers focus their attention and how they navigate visual space. Together with post-viewing questionnaires or annotations, these signals form a robust dataset that supports informed creative decisions.
Module: Biosignal Platform: Collecting and Recording Data Lessons
Explore the first lessons in this module

Lesson 1: Biosignal Platform: Connecting Devices for Data Collection
This lesson provides practical steps for connecting biosignal devices to the Cinematronic Biosignal Platform. You will learn how to set up the Shimmer3 GSR+ for measuring galvanic skin response (GSR/EDA) and recording heart rate, as well as how to integrate the Beam Eye Tracker for gaze analysis. The lesson will also explain what each data source reveals about audience reactions, the significance of these signals in film and media contexts, and how to interpret them in conjunction with creative choices.
Jump to Lesson
Lesson 2: Biosignal Platform: What Can Biometric Data Tell Us
This lesson explores how biometric data can enhance our understanding of audience responses in film and media. Students will focus on three key biosignals: galvanic skin response, heart rate, and eye tracking. The lesson will also cover the autonomic nervous system and the appropriate timescales for measuring these responses. Additionally, the lesson highlights both the potential and limitations of biosignals.
Jump to Lesson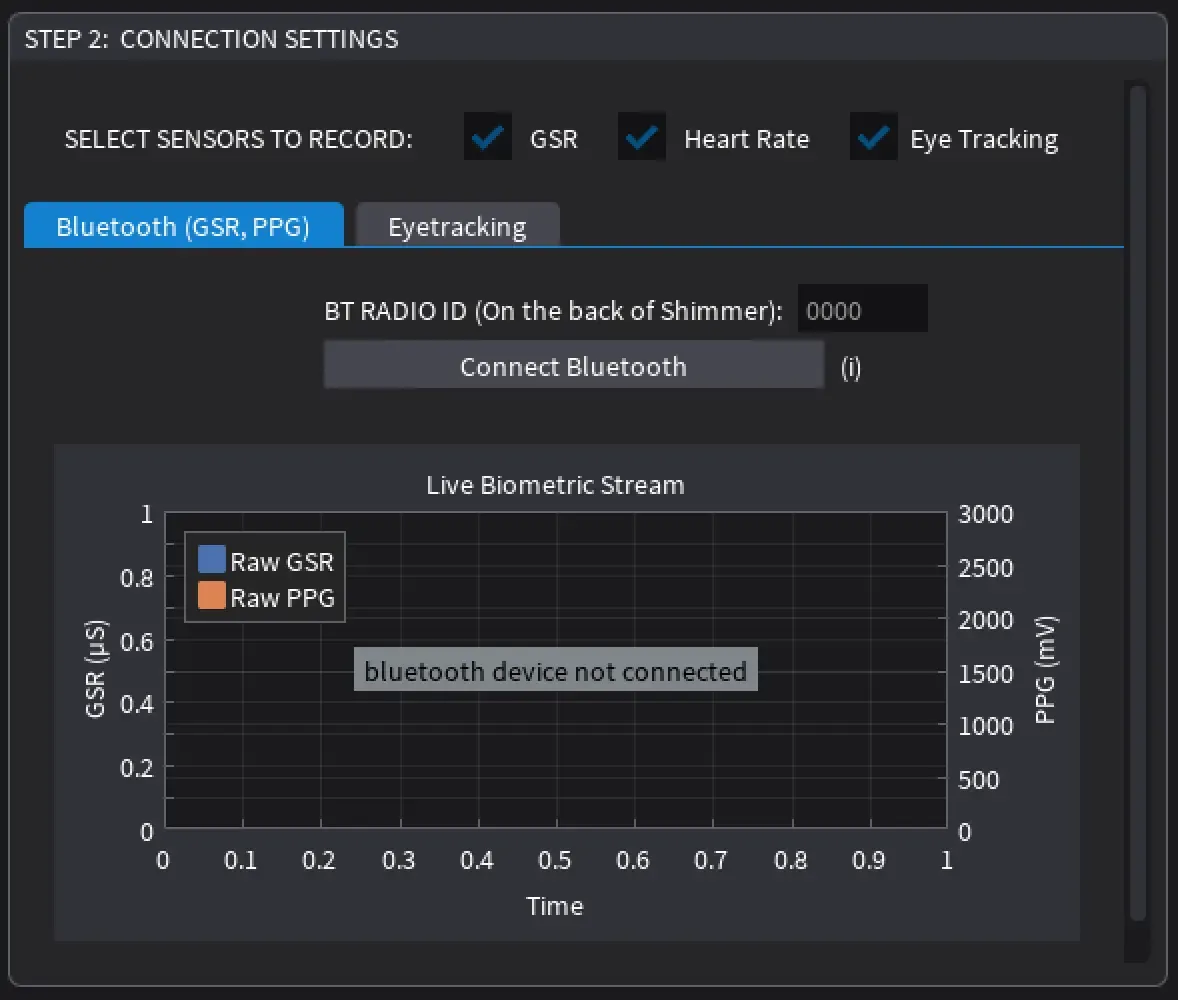
Lesson 3: Biosignal Platform: Connecting the Shimmer (GSR) correctly to the hand
It is easy to connect the Shimmer3 GSR+ incorrectly, resulting in unusable data. This lesson specifies a correct finger-electrode placement on the hand, explains the physiological rationale, demonstrates a two-minute baseline and brief test-cue verification, and shows how to recognise and remediate artefacts. Insights from the Interconnection student case study highlight typical failure modes and their corresponding corrections.
Jump to Lesson